Exposed Aggregate: A Step-by-Step Guide to Style and Durability
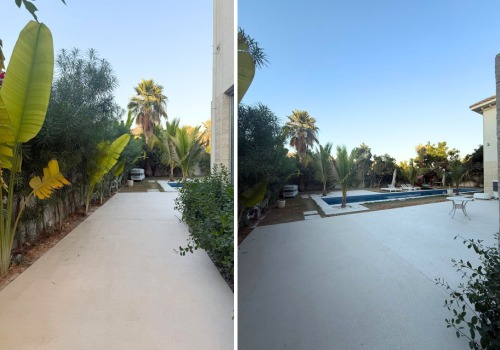
Exposed aggregate flooring is more than simply a surface; it’s a strong statement of personal style. With a breathtaking array of hues and stones, each driveway displays a distinct taste and preference. Its versatility makes it an excellent choice for a variety of architectural types, whether you favor the clean lines of modern design or the allure of classic elegance. The rough finish created by exposing the underlying pebbles and stones adds a natural, inviting feel to any property.
When used for driveways, exposed aggregate not only adds charm to the façade but also creates a unique texture. The exposed stones’ varied colors and sizes offer a stunning visual contrast, improving the driveway’s overall beauty.
This method allows homeowners to personalize their driveways to their preferences by selecting from a variety of aggregates such as granite, quartz, and limestone. This adaptability ensures that each driveway has a unique appearance that complements its surroundings.
Popular Design Options for Exposed Aggregate Concrete
- Natural Stone Patterns
Use a mix of pebbles and stones to achieve a rustic or modern look.
- Colored Aggregate
Add custom hues to the stones for a vibrant or subtle effect.
- Decorative Borders
Frame exposed aggregate surfaces with smooth or stamped concrete for added contrast.
- Polished Aggregate
Combine the textured look with a sleek, glossy finish for a refined appearance.
- Embedded Materials
Incorporate glass, shells, or other decorative items for a personalized touch.
Step-by-Step Installation Guide
We discussed an outline of the steps in our exposed aggregate concrete guide, but that just scratches the surface of the overall process. Here’s a more extensive guide, along with some troubleshooting hints.
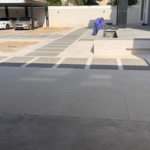
- Base preparation
The installation process begins with excavating the area to the desired depth, which is generally between 4 and 6 inches. It is critical to clear all waste and vegetation and verify that the ground is level. A sub-base material, such as gravel, is then used to provide stability and drainage.
If you encounter soft or unstable soil, reinforce the base with additional compacted gravel or consult a professional for soil stabilisation options. Before digging, always check for underground utilities and use a compactor for an evenly compacted base, ensuring long-term stability.
- Formation
Setting up wooden forms or metal borders is essential for defining the shape and level of the concrete surface. These forms must be firmly supported and exactly level.
If the forms change when pouring, it is critical to pause and readjust them to achieve constant thickness. Double-check measurements and use a level to confirm that forms are accurately put up. Consider the weather conditions; windy days might cause forms to misalign, so try to avoid them.
- Mixing and pouring concrete.
The following stage is the most challenging of all. It involves combining concrete with the desired aggregate to get a consistent consistency. Carefully pour the concrete into the molds, making sure it is evenly distributed. If the mix is too dry, add water slowly; if it is too wet, add additional concrete mix.
Uneven distribution can result in weak regions. Preparation is essential, so have sufficient labor and tools ready. Pre-wetting the aggregates if they are dusty is also important, as dust can reduce the strength of the concrete.
- Leveling & Smoothing
Once poured, the concrete must be leveled using a screed board and smoothed with trowels to provide a flat surface.
If low places are discovered, they should be filled with more concrete and releveled. Overworking the surface might weaken the top layer, so avoid doing so. To avoid delays, work swiftly but thoroughly, making sure that all tools are available and that the crew is well-coordinated.
- Exposing the aggregate.
Depending on the desired finish, exposing the aggregate is an important aesthetic step that can be accomplished by water washing or using a surface retarder. This is done when the concrete has begun to cure but is not completely hardened.
If the aggregate is not sufficiently exposed, gently reapply the procedure, but be careful not to overexpose, as this can dislodge the aggregate. Testing a small area initially can assist determine the best timing for exposure and guarantee even coverage of the surface.
- Curing
Finally, the concrete needs to be allowed to cure correctly. This procedure can take many days and is required for the concrete to reach its maximum strength.
To avoid rapid drying, use a curing compound or keep the surface damp. Otherwise, it may crack. Monitoring weather conditions is also necessary while planning for the curing process. It is always a good idea to avoid excessive traffic on new concrete during this time.
Exposed aggregate driveways offer a perfect blend of durability, aesthetics, and personalization. With a variety of design options and a meticulous installation process, homeowners can create a stunning and long-lasting surface that complements their architectural style. Whether you prefer a rustic charm or a sleek modern finish, exposed aggregate is a versatile choice that enhances curb appeal while ensuring strength and resilience. By following the proper installation and curing steps, you can achieve a driveway that not only stands the test of time but also reflects your unique taste.
 Previous Post